In this article, we will discuss how to use the android RecyclerView. This widget is a more refined and efficient version of ListView with advanced performance and multiple benefits. This component allows developers to show a list of items from an extensive data set and data that change dynamically. For example, the inbox of your Gmail app, you find a list of people who contacted you. In the Twitter app, you find a list of tweets from different people. This feature is achieved easily using RecyclerView.
You can even display a list of cards on recycler view using CardView. Since you will be adding a vast list with many items, RecyclerView provides scrolling capability. You can use standard layout managers i.e., linear layout manager and grid layout manager, to render views to the Recycler View. You can have horizontal and vertical scrolling orientation when you use a linear layout manager. You can as well display items in a grid system where you have two or more items per row when you use the grid layout manager.
With that overview in mind, we will employ a smooth implementation and have this working. We will build our application, and in the end, we shall have it display list of books where we can scroll vertically and horizontally.
Before proceeding, ensure that you have the updated version of Android Studio. You also check the complete information about RecyclerView and more examples from Google developers.
Implementing the RecyclerView Widget
We will demonstrate how to implement RecyclerView in your application. Let’s start by creating a new project using the latest Android Studio and add com.android.support:recyclerview dependency in the build.gradle file.
dependencies {
    implementation fileTree(dir: 'libs', include: ['*.jar'])
   // recyclerview
    implementation 'com.android.support:recyclerview-v7:29.1.0'
}
Versions of your dependencies should match the version of your compileSdkVersion. E.g. mine is 29.
Basic RecyclerView widget and required attributes
<androidx.recyclerview.widget.RecyclerView
    android:id="@+id/recyclerView"
    android:layout_width="match_parent"
    android:layout_height="match_parent"
    android:scrollbars="vertical"/>
Android display a list using RecyclerView
Now let's display some list of books on the recycler view. A book has the title, author, description, and date of publication. The list of books will be aligned vertically on our recycler view. To achieve this, we will create an adapter class.
Without further ado, let's create our application.
Code for main_activity.xml
Copy and paste the following lines in your main_activity.xml found under layout folder.
<?xml version="1.0" encoding="utf-8"?>
<LinearLayout xmlns:android="http://schemas.android.com/apk/res/android"
    xmlns:tools="http://schemas.android.com/tools"
    android:layout_width="match_parent"
    android:layout_height="match_parent"
    tools:context=".MainActivity">
    <androidx.recyclerview.widget.RecyclerView
        android:id="@+id/recyclerView"
        android:layout_width="match_parent"
        android:layout_height="match_parent"
        android:scrollbars="vertical"/>
</LinearLayout>
Creating the Adapter class
Now let’s starting building the adapter class to render the books.
1.Create a new java class called Book.java. Declare title, author, description, and date as private and variables of data type String. Also, generate getters and setters of each variable. The following is the code for this class.
package com.example.recylerviewapplication;
public class Book {
    private String title, author, description, date;
    public Book() {
    }
    public Book(String title, String author, String description, String date) {
        this.title = title;
        this.author = author;
        this.description = description;
        this.date = date;
    }
    public String getTitle() {
        return title;
    }
    public void setTitle(String title) {
        this.title = title;
    }
    public String getAuthor() {
        return author;
    }
    public void setAuthor(String author) {
        this.author = author;
    }
    public String getDescription() {
        return description;
    }
    public void setDescription(String description) {
        this.description = description;
    }
    public String getDate() {
        return date;
    }
    public void setDate(String date) {
        this.date = date;
    }
}
2. Create a layout called book.xml under layout folder. This layout renders a single book item in our recycler view. Code and paste the below code into this xml file.
<?xml version="1.0" encoding="utf-8"?>
<LinearLayout xmlns:android="http://schemas.android.com/apk/res/android"
    android:layout_width="match_parent"
    android:layout_height="wrap_content"
    android:orientation="vertical"
    android:layout_margin="10dp">
    <TextView
        android:id="@+id/title"
        android:layout_width="match_parent"
        android:layout_height="wrap_content"
        android:textSize="20dp"
        android:text="Title"
        android:gravity="center|left"
        android:layout_marginBottom="5dp"
        android:textStyle="bold" />
    <TextView
        android:id="@+id/author"
        android:layout_width="match_parent"
        android:layout_height="wrap_content"
        android:textSize="16dp"
        android:text="Author"
        android:gravity="center|left"
        android:layout_marginBottom="5dp"
        android:textStyle="bold" />
    <TextView
        android:id="@+id/description"
        android:layout_width="match_parent"
        android:layout_height="wrap_content"
        android:textSize="16dp"
        android:text="This is s good written book for all learners. This is s good written book for all learners. "
        android:gravity="center|left"
        android:layout_marginBottom="5dp" />
    <TextView
        android:id="@+id/date"
        android:layout_width="match_parent"
        android:layout_height="wrap_content"
        android:textSize="16dp"
        android:text="Date"
        android:gravity="center|left"
        android:layout_marginBottom="5dp" />
</LinearLayout>
3. Create another java class called BookAdapter.java. This class will have two crucial methods. OnCreateViewHolder() to inflates book.xml and onBindViewHolder() to set appropriate boom data on each row. . Code and paste the below code into this java class.
package com.example.recylerviewapplication; import android.content.Context; import android.view.LayoutInflater; import android.view.View; import android.view.ViewGroup; import android.widget.TextView; import android.widget.Toast; import androidx.recyclerview.widget.RecyclerView; import java.util.ArrayList; public class BookAdaptor extends RecyclerView.Adapter<BookAdaptor.MyViewHolder> { private LayoutInflater inflater; private ArrayList<Book> bookArrayList; private Context ctx; public BookAdaptor(ArrayList<Book> bookArrayList, Context ctx) { inflater = LayoutInflater.from(ctx); this.bookArrayList = bookArrayList; this.ctx = ctx; } @Override public BookAdaptor.MyViewHolder onCreateViewHolder(ViewGroup parent, int viewType) { View view; view = inflater.inflate(R.layout.book, parent, false); BookAdaptor.MyViewHolder holder = new BookAdaptor.MyViewHolder(view); return holder; } @Override public void onBindViewHolder(BookAdaptor.MyViewHolder holder, final int position) { holder.title.setText(bookArrayList.get(position).getTitle()); holder.author.setText(bookArrayList.get(position).getAuthor()); holder.description.setText(bookArrayList.get(position).getDescription()); holder.date.setText(bookArrayList.get(position).getDate()); holder.itemView.setOnClickListener(new View.OnClickListener() { @Override public void onClick(View view) { Toast.makeText(ctx,bookArrayList.get(position).getTitle()+" Clicked",Toast.LENGTH_LONG).show(); } }); } @Override public int getItemCount() { return bookArrayList.size(); } class MyViewHolder extends RecyclerView.ViewHolder { TextView title, author, description, date; public MyViewHolder(View itemView) { super(itemView); title = itemView.findViewById(R.id.title); author = itemView.findViewById(R.id.author); description = itemView.findViewById(R.id.description); date = itemView.findViewById(R.id.date); } } }
Code for MainActivity.java
Now open MainActivity.java class and edit it. The class has a method called createBooks(). This method creates a list of books and adds them to ArrayList. Read more about Java ArrayLists. It then creates a BookAdaptor object and set the arraylist to it. This adapter is set to the recycler view, and we have the list of books displayed. Copy and paste the following code.
package com.example.recylerviewapplication;
import androidx.appcompat.app.AppCompatActivity;
import androidx.recyclerview.widget.DividerItemDecoration;
import androidx.recyclerview.widget.LinearLayoutManager;
import androidx.recyclerview.widget.RecyclerView;
import android.os.Bundle;
import java.util.ArrayList;
public class MainActivity extends AppCompatActivity {
private RecyclerView recyclerView;
ArrayList<Book> bookArrayList;
private BookAdaptor bookAdaptor;
@Override
protected void onCreate(Bundle savedInstanceState) {
super.onCreate(savedInstanceState);
setContentView(R.layout.activity_main);
recyclerView = findViewById(R.id.recyclerView);
createBooks();
}
private void createBooks() {
bookArrayList = new ArrayList<>();
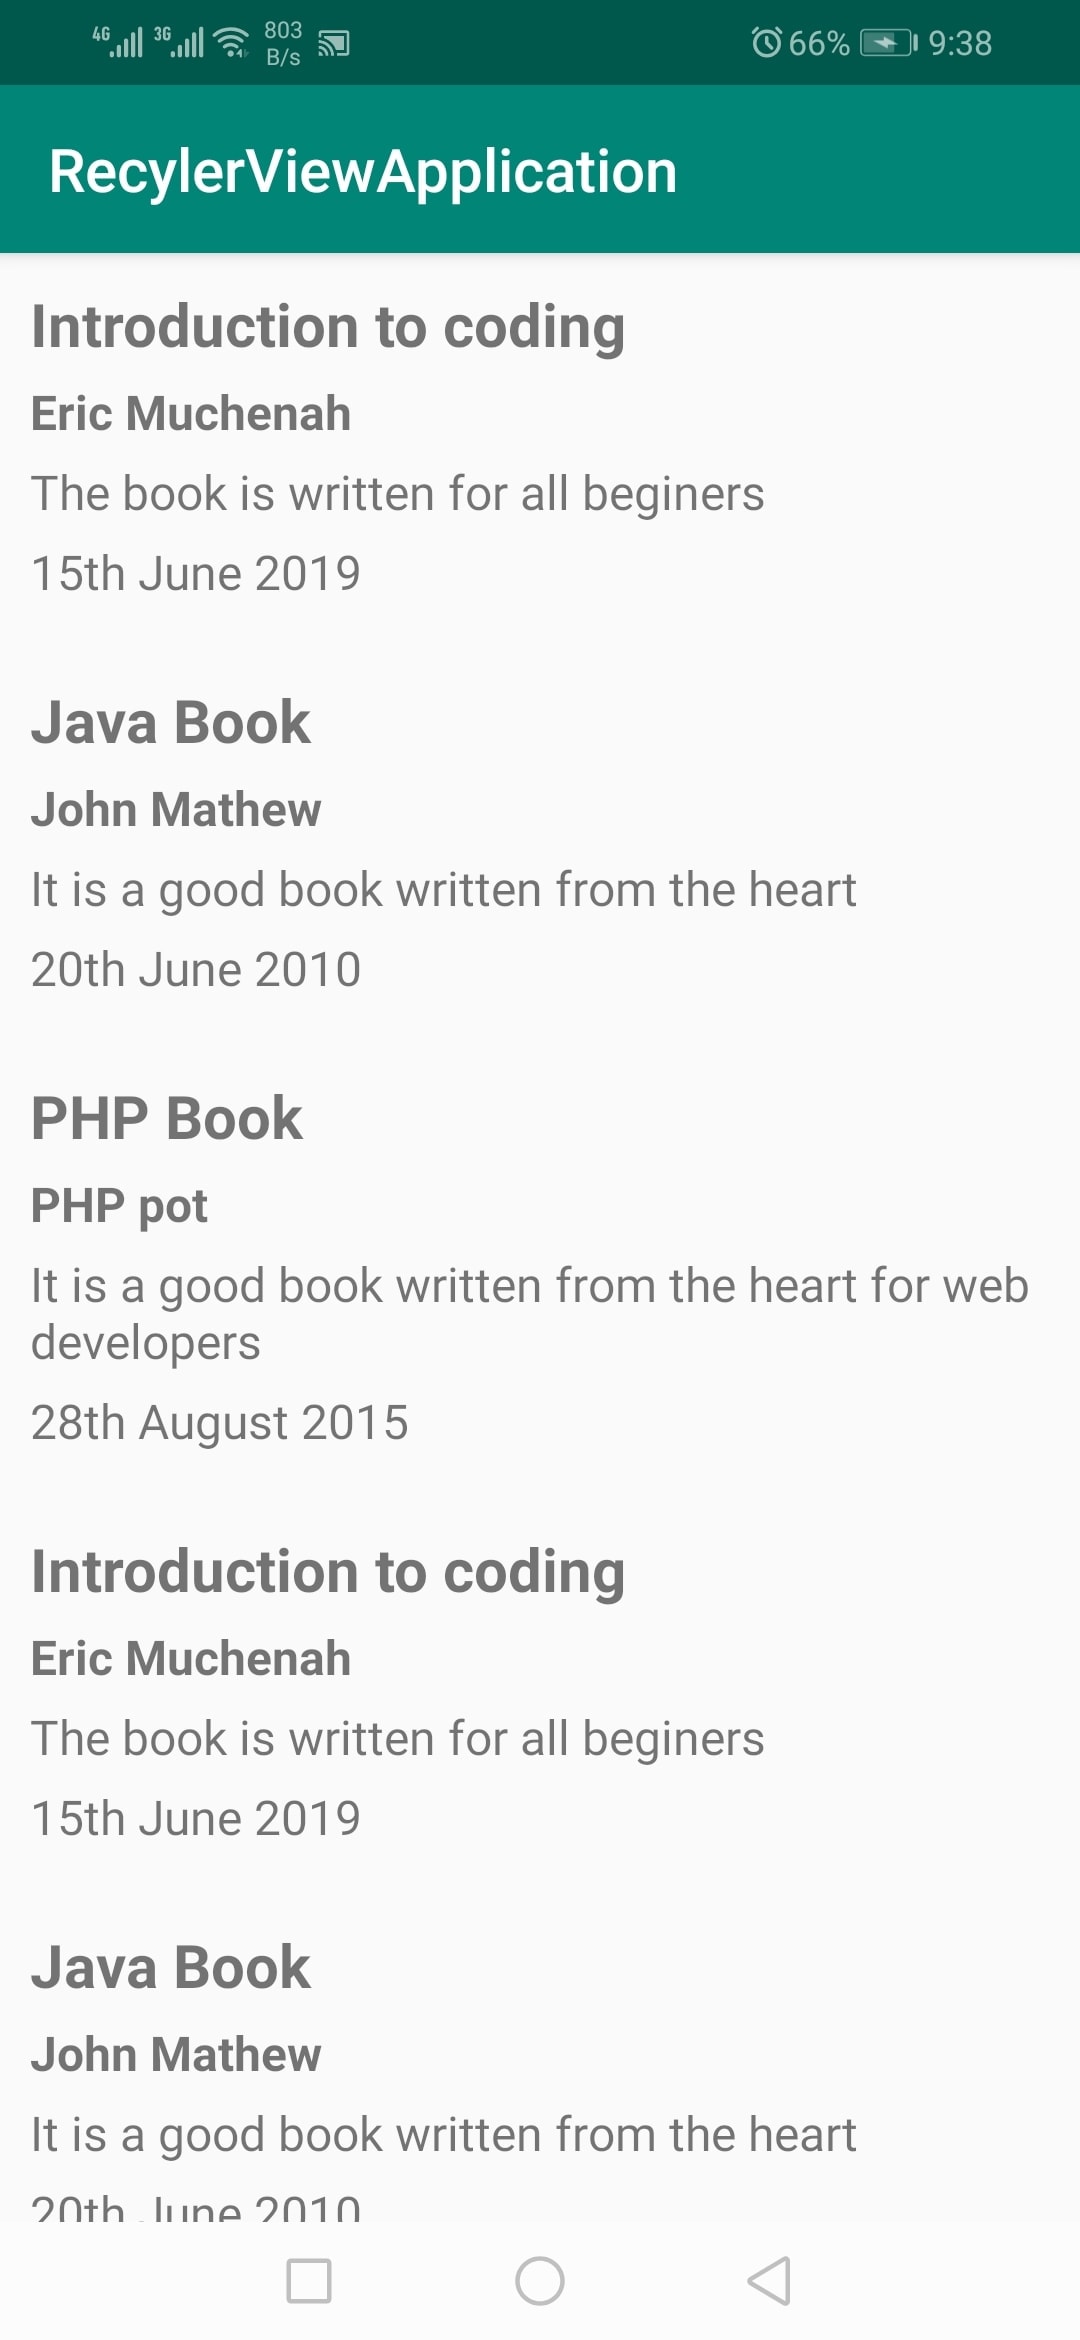
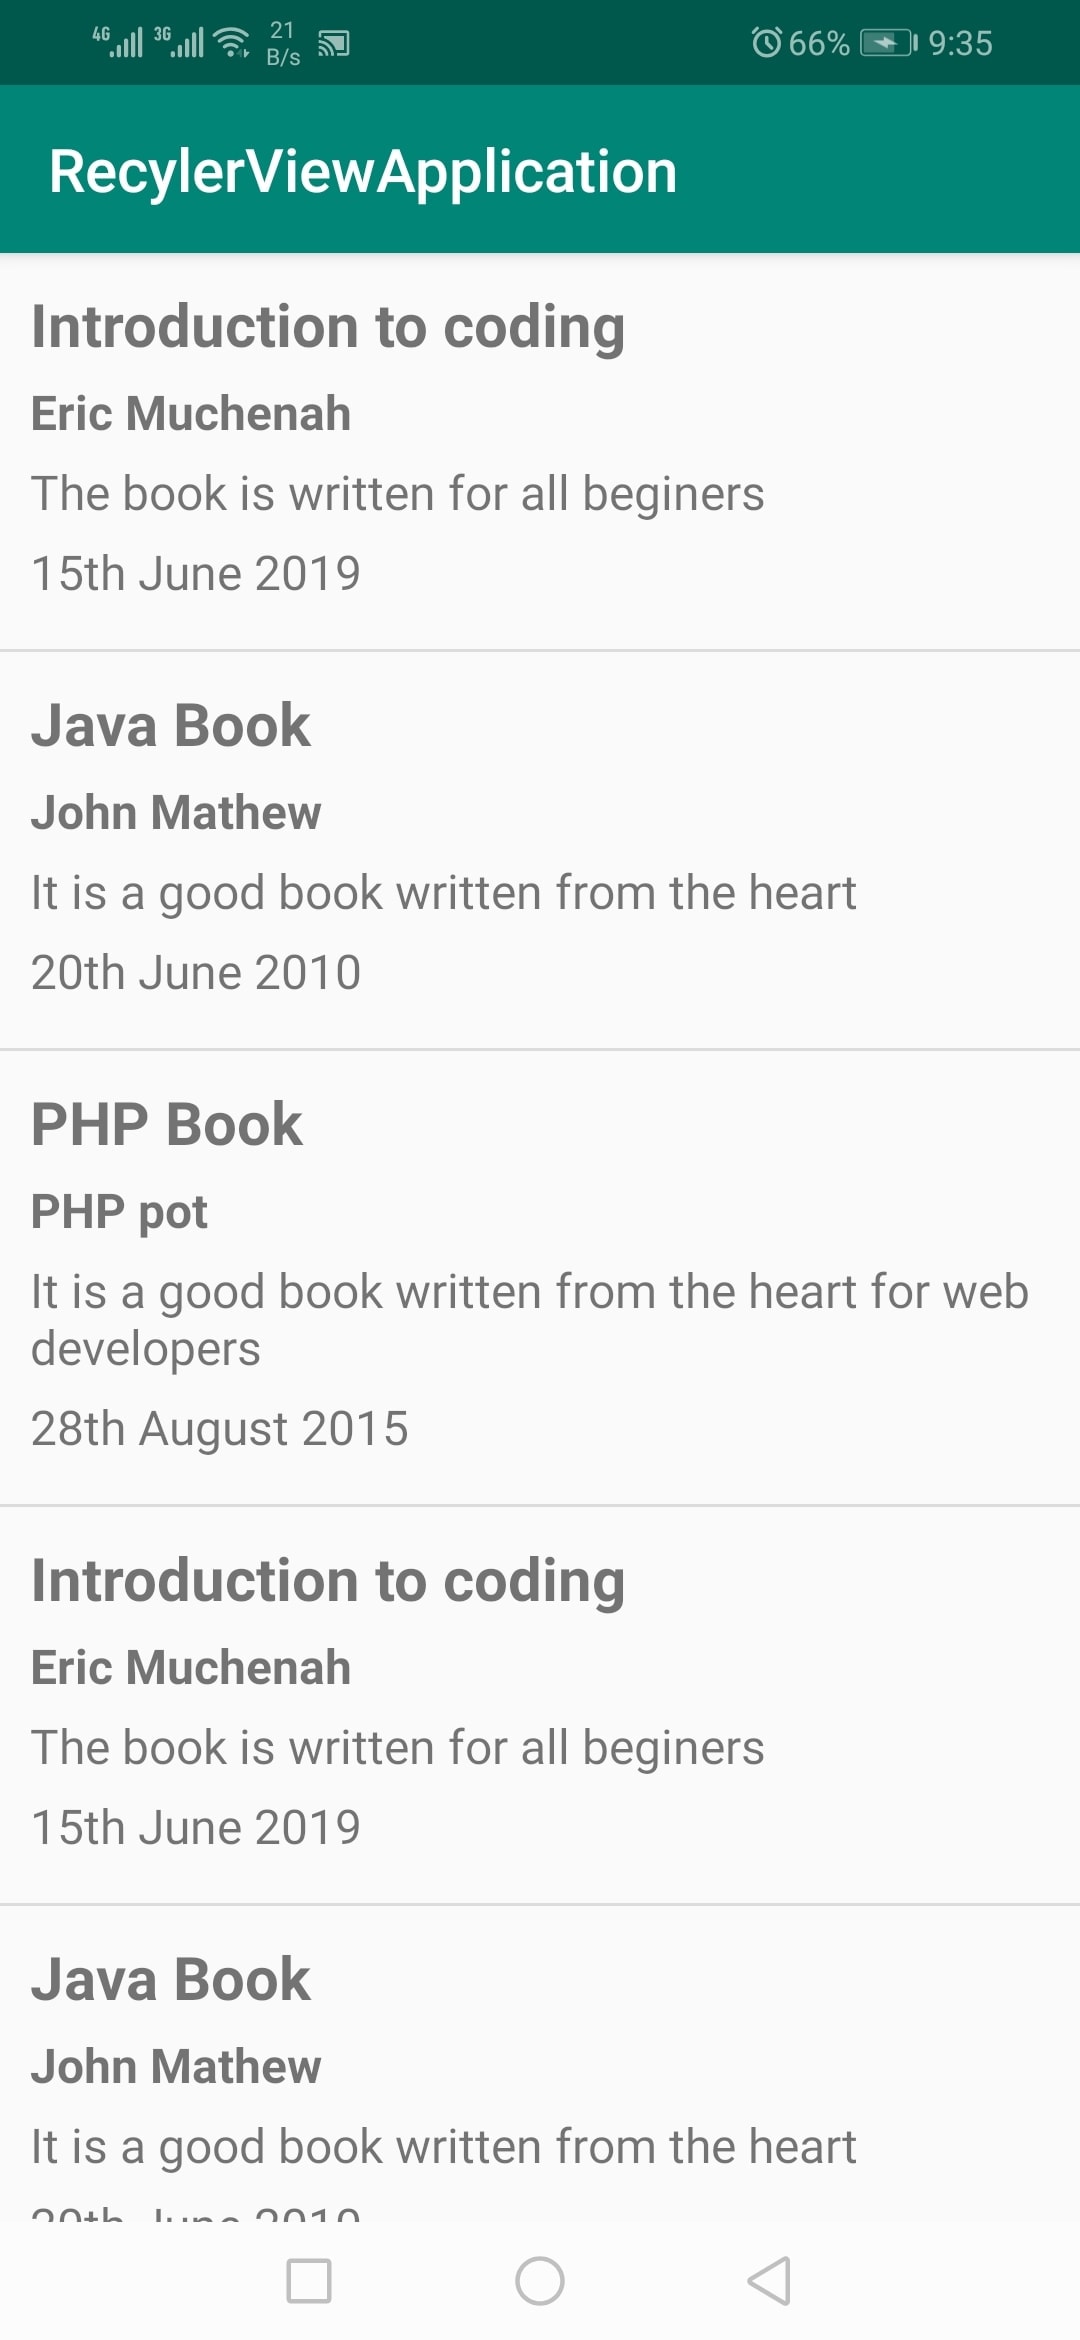
bookArrayList.add(new Book("Introduction to coding", "Eric Muchenah", "The book is written for all beginers", "15th June 2019"));
bookArrayList.add(new Book("Java Book", "John Mathew", "It is a good book written from the heart", "20th June 2010"));
bookArrayList.add(new Book("PHP Book", "PHP pot", "It is a good book written from the heart for web developers", "28th August 2015"));
bookAdaptor = new BookAdaptor(bookArrayList, getBaseContext());
recyclerView.setAdapter(bookAdaptor);
recyclerView.setLayoutManager(new LinearLayoutManager(getBaseContext(), LinearLayoutManager.Vertical, false));
recyclerView.setNestedScrollingEnabled(false);
}
}
Now, if you run the app, you can see the books displayed in a list manner.
Adding RecyclerView Divider / Separator
recyclerView.addItemDecoration(new DividerItemDecoration(this, LinearLayoutManager.VERTICAL));
Displaying Horizontal Scrolling RecyclerView
recyclerView.setLayoutManager(new LinearLayoutManager(getBaseContext(), LinearLayoutManager.VERTICAL, false));
recyclerView.setLayoutManager(new LinearLayoutManager(getBaseContext(), LinearLayoutManager.HORIZONTAL, false));
Adding Item Click Listener on RecyclerView
holder.itemView.setOnClickListener(new View.OnClickListener() {
    @Override
    public void onClick(View view) {
        Toast.makeText(ctx,bookArrayList.get(position).getTitle()+" Clicked",Toast.LENGTH_LONG).show();
    }
});holder.author.setOnClickListener(new View.OnClickListener() {
@Override
public void onClick(View view) {
Toast.makeText(ctx,bookArrayList.get(position).getAuthor()+" – Author clicked this time",Toast.LENGTH_LONG).show();
}
});