A splash screen is a window containing a logo and the version of the application. A splash screen appears while the application or game is launching. You should have seen this in many apps like YouTube, Twitter, Facebook, Fiverr, etc. Also, many IDEs such as Android Studio, NetBeans, and Eclipse, etc. have a splash screen that shows when the apps are launching.
Splash screens are explicitly used by large applications and games to tell the user that the application is really in the process of loading. They signal that a lengthy task is underway. Sometimes a progress bar is displayed within the splash screen to indicate the loading progress. A splash screen disappears as soon as the main activity/window appears.
Splash screen also enhances the look and feel of an application or game. Hence they occasionally have animations, sound, and graphics. Some lightweight applications may use splash screens for branding, i.e., just displaying company logo and name without much background activity.
In this tutorial, you will learn different methods of creating splash screens for your Android applications.
This is a quick overview of the methods.
- Method 1: Using Handler class and specify a layout file for splash screen activity.
- Method 2: Specify the main activity's theme background as a splash screen layout.
The second method is the most efficient way to implement a splash screen because of the reason we shall see.
First, let's implement a splash screen using method 1 and explain why it is not the best.
Splash Screen Example Using Handler Class and Splash Screen Activity
Let's start by creating a new project in Android Studio.
1. Go to File ⇒ New Project. When it prompts you to select the default activity, select Empty Activity, and proceed.
2. Open activity_main.xml under res -> layout folder and paste the following code.
<?xml version="1.0" encoding="utf-8"?>
<androidx.constraintlayout.widget.ConstraintLayout xmlns:android="http://schemas.android.com/apk/res/android"
    xmlns:app="http://schemas.android.com/apk/res-auto"
    xmlns:tools="http://schemas.android.com/tools"
    android:layout_width="match_parent"
    android:layout_height="match_parent"
    tools:context=".MainActivity">
    <TextView
        android:layout_width="wrap_content"
        android:layout_height="wrap_content"
        android:text="Welcome to the Big App!!"
        app:layout_constraintBottom_toBottomOf="parent"
        app:layout_constraintLeft_toLeftOf="parent"
        app:layout_constraintRight_toRightOf="parent"
        android:textSize="30dp"
        android:textStyle="bold"
        app:layout_constraintTop_toTopOf="parent" />
</androidx.constraintlayout.widget.ConstraintLayout>
3. Now open MainActivity.java and paste the following code:
package com.example.splashscreen1;
import androidx.appcompat.app.AppCompatActivity;
import android.os.Bundle;
public class MainActivity extends AppCompatActivity {
    @Override
    protected void onCreate(Bundle savedInstanceState) {
        super.onCreate(savedInstanceState);
        setContentView(R.layout.activity_main);
    }
}
4. Please create a new empty activity and call it SplashScreenActivity. Paste the following code in activity_splash_screen.xml. This layout has your app logo at the center and version of the application at the bottom.
<?xml version="1.0" encoding="utf-8"?>
<LinearLayout xmlns:android="http://schemas.android.com/apk/res/android"
    xmlns:tools="http://schemas.android.com/tools"
    android:layout_width="match_parent"
    android:layout_height="match_parent"
    tools:context=".SplashScreenActivity"
    android:orientation="vertical">
    <LinearLayout
        android:layout_width="match_parent"
        android:layout_height="match_parent"
        android:layout_weight="1"
        android:gravity="center"
        android:orientation="vertical">
        <ImageView
            android:layout_width="match_parent"
            android:layout_height="wrap_content"
            android:layout_gravity="center"
            android:src="@drawable/logo">
        </ImageView>
    </LinearLayout>
    <TextView
        android:layout_width="match_parent"
        android:layout_height="wrap_content"
        android:text="Version: 1.0.0"
        android:textSize="30dp"
        android:gravity="center"
        android:layout_marginVertical="20dp"
        android:textStyle="italic">
    </TextView>
</LinearLayout>
5. Paste the following code in SplashScreenActivity.java:
package com.example.splashscreen1;
import androidx.appcompat.app.AppCompatActivity;
import android.content.Intent;
import android.os.Bundle;
import android.os.Handler;
public class SplashScreenActivity extends AppCompatActivity {
    private Handler handler;
    @Override
    protected void onCreate(Bundle savedInstanceState) {
        super.onCreate(savedInstanceState);
        setContentView(R.layout.activity_splash_screen);
        handler=new Handler();
        handler.postDelayed(new Runnable() {
            @Override
            public void run() {
                Intent intent=new Intent(SplashScreenActivity.this,MainActivity.class);
                startActivity(intent);
                finish();
            }
        },3000);
    }
}
In the code above, we used the Handler class to hold the screen for three seconds before showing the main activity. We defined time in milliseconds in the postDelayed() method. 1 second = 1,000 milliseconds, so we set out time to 3,000 milliseconds.
PostDelayed() method will delay for three seconds, after which our main activity will be launched.
6. Now to ensure SplashScreenActivity launches first, open AndroidManifest.xml and change splashscreenactivity.java as the launcher activity and mainactivity.java as a normal activity. You can paste the following code:
<?xml version="1.0" encoding="utf-8"?>
<manifest xmlns:android="http://schemas.android.com/apk/res/android"
    package="com.example.splashscreen1">
    <application
        android:allowBackup="true"
        android:icon="@mipmap/ic_launcher"
        android:label="@string/app_name"
        android:roundIcon="@mipmap/ic_launcher_round"
        android:supportsRtl="true"
        android:theme="@style/AppTheme">
        <activity android:name=".MainActivity"></activity>
        <activity android:name=".SplashScreenActivity">
            <intent-filter>
                <action android:name="android.intent.action.MAIN" />
                <category android:name="android.intent.category.LAUNCHER" />
            </intent-filter>
        </activity>
    </application>
</manifest>
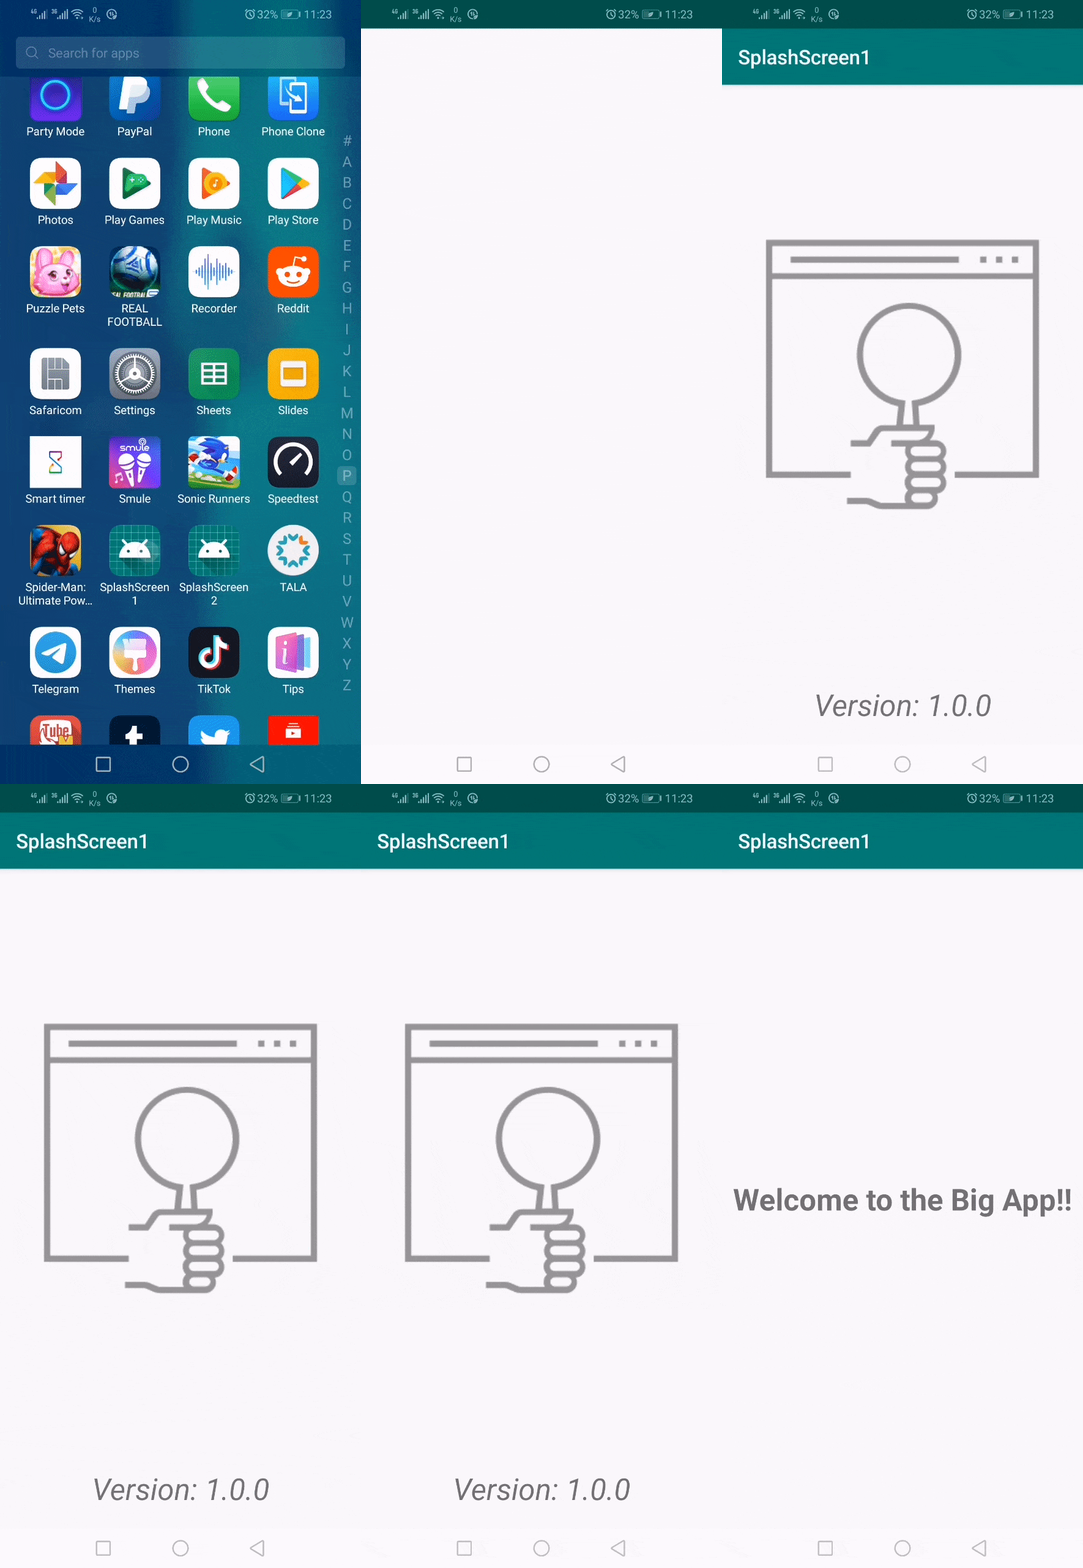
7. Now run your app, and you will see a splash screen before the main activity.
Output
When you run the app, you will see the splash screen launched before the main activity, as shown in the figure below.

So the problem with this implementation is that your app users will have to wait for three seconds every time they launch your activity. This is too much time, right? And your users might end up closing your app and going to other apps like YouTube, Facebook, Twitter, and the rest. To avoid wasting your users' precious time, we shall use an efficient way to implement Android Splash Screen.
Splash Screen Example Using the main activity's theme background
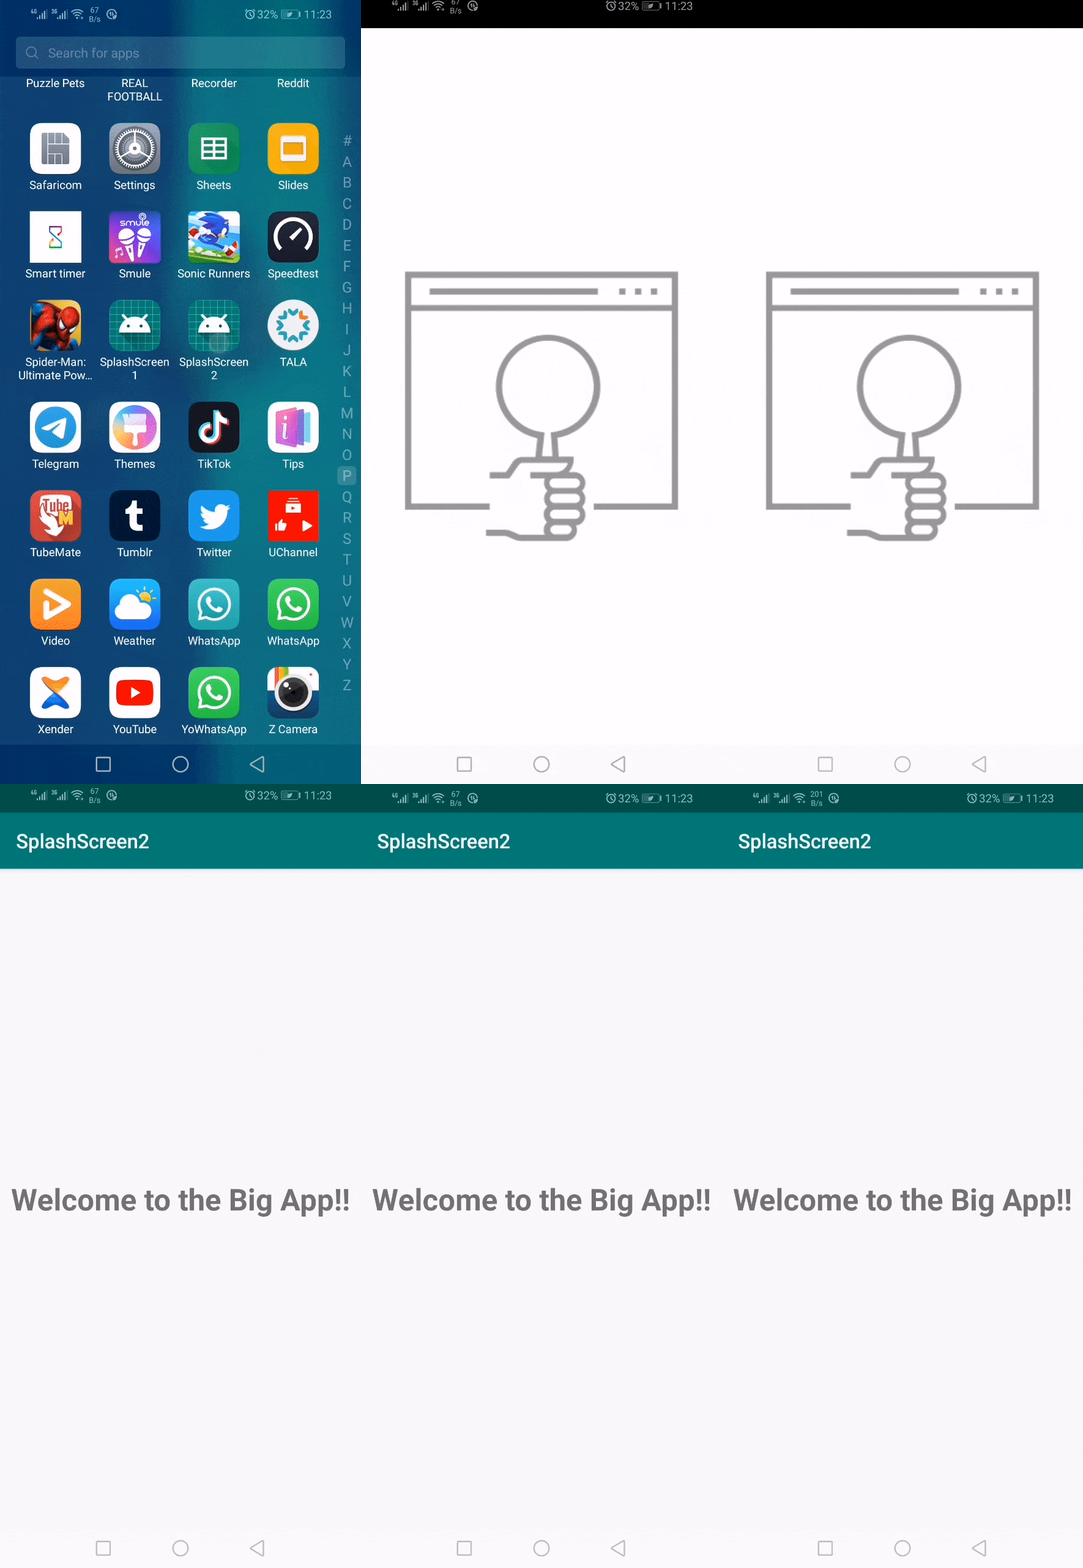
This way is the best to implement a splash screen in Android. Your app logo and version will be shown as the application launches. In this scenario, the splash screen will be shown for the time it takes to launch the application. So if a phone is faster, the splash screen will be shown for a few seconds or even milliseconds. If the phone is slower, the splash screen will be displayed for a longer time.
Basically, in this scenario, the duration of the splash screen depends on the number of background activities that takes place while the application launches while the first implementation had a fixed period of three seconds.
Now let’s see how we implement this.
1. Go to File ⇒ New Project. When it prompts you to select the default activity, select Empty Activity, and proceed.
Call the second project, Splashscreen2.
2. Open activity_main.xml under res -> layout folder and paste the following code.
<?xml version="1.0" encoding="utf-8"?>
<androidx.constraintlayout.widget.ConstraintLayout xmlns:android="http://schemas.android.com/apk/res/android"
    xmlns:app="http://schemas.android.com/apk/res-auto"
    xmlns:tools="http://schemas.android.com/tools"
    android:layout_width="match_parent"
    android:layout_height="match_parent"
    tools:context=".MainActivity">
    <TextView
        android:layout_width="wrap_content"
        android:layout_height="wrap_content"
        android:text="Welcome to the Big App!!"
        app:layout_constraintBottom_toBottomOf="parent"
        app:layout_constraintLeft_toLeftOf="parent"
        app:layout_constraintRight_toRightOf="parent"
        android:textSize="30dp"
        android:textStyle="bold"
        app:layout_constraintTop_toTopOf="parent" />
</androidx.constraintlayout.widget.ConstraintLayout>
In this step, we shall add the code to display the splash screen.
3. Create a new XML layout in res -> drawable and call it splashscreenbackground.xml
<?xml version="1.0" encoding="utf-8"?>
<layer-list xmlns:android="http://schemas.android.com/apk/res/android">
    <item>
        <color android:color="#FFF"/>
    </item>
    <item>
        <bitmap
            android:src="@drawable/logo"
            android:tileMode="disabled"
            android:gravity="center"/>
    </item>
</layer-list>
Note we are creating the file in drawable and not in the layout folder. And also, we are not creating splashscreenbackground.java for the same.
In this file, we shall use a layer list to show our app logo at the center and the version at the bottom. It is a good practice to use a bitmapped image to display the logo. The image should be PNG or JPG.
4. Now create a theme for the splash screen activity. We will create a custom theme ad add it to styles.xml file. The new custom theme is called SplashTheme. Paste the following code in styles.xml under the res -> values folder.
<resources>
    <!-- Base application theme. -->
    <style name="AppTheme" parent="Theme.AppCompat.Light.DarkActionBar">
        <!-- Customize your theme here. -->
        <item name="colorPrimary">@color/colorPrimary</item>
        <item name="colorPrimaryDark">@color/colorPrimaryDark</item>
        <item name="colorAccent">@color/colorAccent</item>
    </style>
    <style name="SplashTheme" parent ="Theme.AppCompat.Light.NoActionBar">
        <item name="android:windowBackground">@drawable/splashscreenbackground</item>
        <item name="android:windowNoTitle">true</item>
        <item name="android:windowFullscreen">true</item>
    </style>
</resources>
5. Paste the following code in MainActivity.java
package com.example.splashscreen2;
import androidx.appcompat.app.AppCompatActivity;
import android.content.Intent;
import android.os.Bundle;
public class MainActivity extends AppCompatActivity {
    @Override
    protected void onCreate(Bundle savedInstanceState) {
        super.onCreate(savedInstanceState);
        startActivity(new Intent(MainActivity.this,MainActivity2.class));
        finish();
    }
}
We do not call the setcontentview() method because we directly applied the splash theme on it. Now we start the second activity, MainActivity2.java, and finish the current activity by calling finish() method.
6. Paste the following code in MainActivity2.java
package com.example.splashscreen2;
import androidx.appcompat.app.AppCompatActivity;
import android.os.Bundle;
public class MainActivity2 extends AppCompatActivity {
    @Override
    protected void onCreate(Bundle savedInstanceState) {
        super.onCreate(savedInstanceState);
        setContentView(R.layout.activity_main);
    }
}
In this activity, we call setcontentview() to display the main activity layout.
7. Open Android Manifest file and assigned the splash theme to it like this
Android:name=”.MainActivity”android:theme=”@style/SplashTheme”>
This is the full code for Android Manifest file
Output
When you run the app, you will see a splash screen launched before the main activity, as shown in the figure below.

You may like:
- Android Swipe Down to Refresh a Layout Example
- Android RecyclerView with Example for Beginners
- Android Upload Image to Server Using Retrofit
Conclusion
That is how to implement a Splash screen in Android using the two methods. As you have seen, the second implementation is the best and is being used by big companies in their apps.
You can get the complete code for Android Upload Image to Server Using Retrofit from my GitHub repository. You may also make changes to the code and use it in your projects.
Thank you for reading this article. Please vote below and share it with your friends and fellow android developers.


